Graybeard Outdoors banner

Working without the proper tools

11K views 46 replies 7 participants last post by  elkslayer4x5  
#1 ·
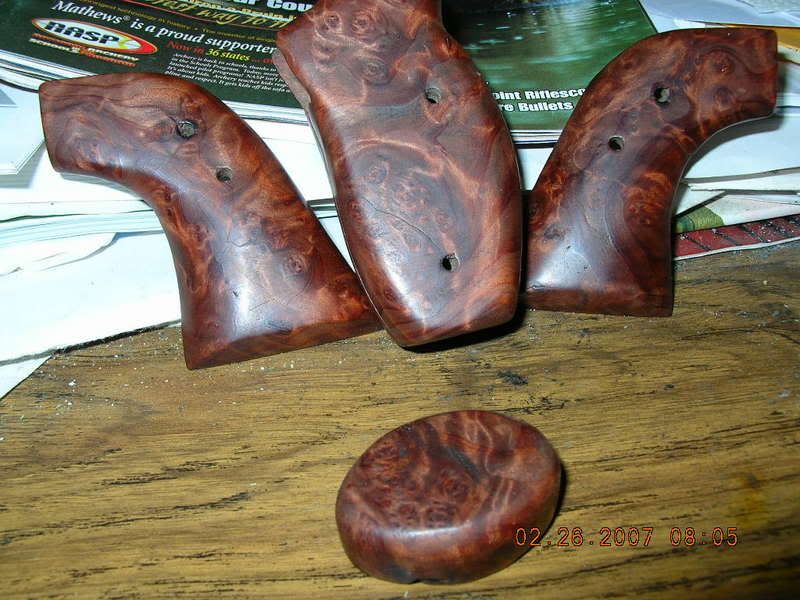
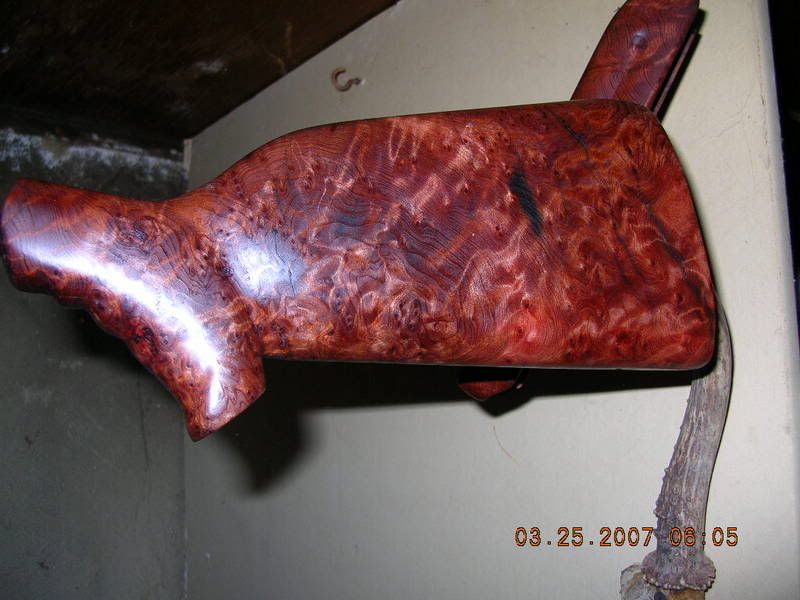
Some of you may have seen some of the gun stocks that my son and I make. We make 'em the hard way, without the proper tools, because we don't have them. Sort of a mixture of really old school and a few proper tools. The most difficult part of making a two piece gun stock is drilling the hole. I'm sure that it would be much easier if we had a production model drill press, capable of a 13-14" swing. A handi butt stock is around 12-12 1/2" In order to drill a hole that long, we use a 1/2 varible speed drill motor anchored to a wooden bed. We have made a few modifications so that we can level the drill bit, and control lateral movement. Notice the elevation screws on the front of the drill, and the horizontal adjustment screws on the back, behind the trigger. Currently, we are just using shims under the back of the drill motor.


We have a center line drawn on the drilling bed, and on the sliding table. We establish the bolthole line that we need, draw that line on the stock blank and anchor the stock blank to the sliding table, matching the lines.


We drill from the butt to the reciever end, using three steps. We start with a 7/8 spade bit, and push the sliding table into the drill motor, until we reach the full length of the spade bit, un chuck that bit and chuck up an extenision, snap the spade bit back in and mark ( with a piece of duct tape ) on the shaft of the extension, the final depth of the 7/8" hole. We make a slimmer stock than Handi does so we stop our bolt hole 4 1/2" from the reciever end, so that the end of the 7/8" hole is in a thicker part of the stock, to do that, we use a 5" bolt.


In the above photo you can see the extension and the spade bit, and the duct tape marker. Under the bench is our converted dust collection system, R2 DustToo. After we reach the maximim depth, we switch to the 3/8 long spade bit, seen here.

 
#2 ·
The stock blank pictured above is going to be a left handed Monte Carlo that my son is making for a member of this board. I have just one more pic to add today, and that is the forestock that I'm making for Ken. I'll post more of this build along in the comming days, right now, it's time to get back to it! Before you ask, yes same size as my foreend, so hows it look so far Ken?

 
#3 ·


After the hole is drilled, its time to cut out the stock shape, and then taper the blank. To do that we use a router, but first we draw the stock on the blank, including the cheekpiece. We set the blank on a router table, clamped in a vise. Secure the blank so that it does'nt move, and build up a surface for the router base to run on, I usually try to be a 1/4" above the stock blank. Next I set the router bit to the depth of the recoil pad allowance line. A brief note here, all router cuts are made to be 1/32" - 1/16" proud of the final finish size, and sand down to final finish. To set the taper of the stock, 1 3/4" at the recoil pad, and 1 3/8 at the reciever, we place a shim under the reciever end. Route the side with out a cheekpiece first, so that when you turn the blank over you have a solid, even surface in contact with the router table, then turn the blank over.


Set the taper as before, then carefully follow the outline of the cheekpiece, then working away fron the cheekpiece take the rest of the excess wood off. As my son said once, "making a gun stock is easy, drill the bolthole, draw the stock and cut away anything that is'nt gun stock". We now have a rough shape of a gun stock, and its time to form the stock.
We built a stock forming clamp to hold the stock while we take away most of the un-gun stock wood.


For this we go back to a really old school tool, a wood rasp, working from the center line ( offset to account for the cheekpiece ) round off the square edges to the bolthole line, also drawn on the blank. Rasp until you have the shape you want, take your time, its hard work. Take plenty of breaks, and after the feeling has returned to your hands, continue until you 'ger er done'! The following pics are Ken's right handed Monte Carlo stock.


Today, I'll shape the hand grip. See tommorow's posts. Please feel free to comment, we welcome any constructive suggestions.
 
#4 ·
drilling the hole in the forend. it has to be centerd and a distance from the end is key... get it to short and it wont fit. :-[
once thats done we move on to releaving the stock for the lug.. get that all done , then i move on to shaping
Image

Image
 
#6 ·
Traded the stock I had in the 'wanted to trade H & R' forum, part of the deal was another couple of coats of Tru-Oil. Power went out right after dinner tonight, my son can't sleep with out his Cpap, so we're out in the garage hand sanding, under the glow of a couple of LEDs, and by the time to power came back on, I'd sanded off the old Tru-Oil, then wore a half sheet of 220 on the set. We'll see if we can find any finer paper here in our small city. I'll raise the grain again this morning, and polish 'em some more before I re-apply the Tru-Oil, told 6x5 that I'll miss this stock when she's gone. Here is where I got that stock blank, it was a slab off the root ball of a small California Redwood, Sequioa Semperviren.

Image


I quit smoking in Dec of 06, and by Feb I needed to keep my hands and mind busy so I cut up that yard table into 5 adult sized stock blanks, and one youth sized blank. On the first blank, I drilled the hole croocked, got the 5" bolt stuck, and had to cut it apart. Started another, and found a few problems. Scrap that one for a while, too.

Image


Thats the stock I'm trading to Frank for a .280 barrel, and some coin of the realm. I had to go 3/4" deep to route out that rot, found a pretty piece of burl to glue in, but could'nt get it sanded flat enough to laminate with the little palm sander I had, so I made a third stock, which is still on my .25-06, currently my grandson favorite rifle. Went back to work on this stock after finishing mine and my daughter-in-law's stock, called it The Lady Handi.

Image


In April of 07 I began repairing this stock,

Image

Image


Finally got around to finishing that stock earlier this year, when I began offering it for trade, and this morning it looks like this.

 
#7 ·
I tell you, when I first saw this stock set with just one coat of Tru-Oil on it I knew I had to have it.
I can only imagine what it is going to look like with some more sanding and a couple more coats to bring out the grain/shine.
Should be a really good looking set!
I am kind of glad there was damage in the wood as I am sure it wouldn't have come up for trade otherwise.
The Myrtle accents really set it off and even the repaired butt stock has a distinctive different look that doesn't really detract from the over all appearance, at least in my mind.

Image


I think I am really going to like this set after it finished.
Now to decide what caliber to put it on.
Maybe that custom 28" 38-55 Target Classic I am going to have re-done into a 405 Winchester! ;) :D


LONGTOM
 
#8 ·
As 6x5 and I sat basking in the glow of the LEDs and the trusty Big Buddy heater last night, one of the thing we talked about was ....How many time did You, LONGTOM View my add for this stock, I've noticed that every time I visit a thread, the view count goes up. Just wondering how many time did you take another look at this stock? You'll be pleased with what will show up as I continue to work my way to the finer grit papers, if I can find anything finer than 220 aluminum oxide. We're only 20 miles from a large metroplex area, and our stores here only carry what the average homeowner would be likely to buy.
On another project, I've finished rough shaping Ken's all Redwood right handed Monte Carlo, and worked it over really well with the 60 grit on the palm sander to remove all the rasp scars, and started final shaping with the 100 grit. Here's what your stock is now looking like now , did'nt work on the grip like I said I would but will later today.


#11 ·
How many time did You, LONGTOM View my add for this stock,
HA HA!
Many many times I went back drooling over it until it got the best of me.
Sometimes you look at things so long that you just tell yourself enough is enough.
Either get it or quit looking at it!


LONGTOM
 
#12 ·
I'm real happy with your decision! :D I working the stock set over with 320 wet/dry, am down to wood, old finish is gone, and I'm rubbing a high polish on it now, start to glow and the iridesence is showing without the Tru-Oil, by the time I rub in several coats of Tru-Oil, the set will shine. Gonna stock your custom .405 Win with it? What did you use as a donor barrel? I don't recall H & R making a .405 Win barrel, my first though is you had a .38-55 rebored and chambered in .405. No? :)
 
#13 ·
Yes it is a 38-55 barrel.
I left the caliber out in the other reply.
I went back and fixed it.


LONGTOM
 
#21 ·
as in grip panels... they are a lot of fun you will need lot o sand paper.. a nice rasp helps along witha router if you need to do any relelaving to fit a frame...you can do alot with a dremel tool. great for shaping.. good luck post up some pictures when you get going on your project 8)
 
#23 ·
Here's a couple of revolver grip panels I made, the center one is two parts that enclose the frame, did that inletting with a rotozip, could'nt find a pic of the inside but that grip fits a Taurus Tracker. The biggest problem I had in making pistol grips was in finding a good supply of grip panel ferrels, if you find a supplier please let us know. As 6x5 said, post pic of your progress, and feel free to ask us any questions you may have.

Image
 
#24 ·
Brownells and I think Midway have them . I have not ordered them yet but have been looking to find all the parts. There is a local place for wood of all knids , will try the less expensive stuff first . One goal is to duplicate some grips I have in walnut in ebony . They fit a J frame S&W and are very compact .
 
#25 ·
Found the grip panel ferrels on Brownells, both sides, and the screws, but no photo, but it come to $12 a set, Prety spendy when you're trying to makes 'em for sale. Nothing but a ton of grip panels on Midway.
I would suggest that for your first pair, that you try working with a less expencive wood, heck even some fir or pine would work well enough for you to get a feel of how to work on them, as with most thing it takes practice, and I'd much rather make a mistake on some throwaway pieces than on something like Ebony. My above photo was my 3rd set, I've got two bad sets in the scrap box, of both types. :)