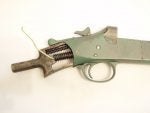
I decided I wanted to kill a turkey with this old gun, I hunted with it when I was a kid, killed lots of grouse, pheasant and a few ducks with it, and my Dad killed a tom with it in 1996, we called it in close and he shot it with regular high base 2¾ #6 loads, he wouldn't shoot magnums in it!  It has a full choke which Federal recommends for their Flitecontrol ammo, so I decided to try it, but after getting the gun back from my uncle who acquired it after Dad died, I found it full of about 100yrs of dirt, so I disassembled it to clean it, the steel trigger guard has only one pin in it that is also the trigger hinge, no lower front pin as on newer H&Rs. The large coil spring is the main spring or hammer spring and is a bear to remove if done incorrectly (which I learned after the fact!! :), if you c o c k the hammer, you should find a hole in the the rear of the main spring guide(part 56 on the 1900 parts diagram), the hole on mine was full of dirt just like the rest of the action and why I decided to cleqn it in the first place before I shoot it, so I didn't see it, should have figured the notch was for something tho, but hindsight is always more accurate than forethought!! I put a yellow paper clip in the hole for clarification, you **** the hammer and hold the hammer all the way back, insert a pin in hole, then the hammer can be lowered and the spring is held in place preloaded and can be removed for disassembly. Pins are smooth, so they can be removed from either side.
Hope this helps someone,
Tim
http://www.gunpartscorp.com/Manufacturers/HarringtonRichardson-33274/Shotguns-36451/1900-40868.htm
It has a full choke which Federal recommends for their Flitecontrol ammo, so I decided to try it, but after getting the gun back from my uncle who acquired it after Dad died, I found it full of about 100yrs of dirt, so I disassembled it to clean it, the steel trigger guard has only one pin in it that is also the trigger hinge, no lower front pin as on newer H&Rs. The large coil spring is the main spring or hammer spring and is a bear to remove if done incorrectly (which I learned after the fact!! :), if you c o c k the hammer, you should find a hole in the the rear of the main spring guide(part 56 on the 1900 parts diagram), the hole on mine was full of dirt just like the rest of the action and why I decided to cleqn it in the first place before I shoot it, so I didn't see it, should have figured the notch was for something tho, but hindsight is always more accurate than forethought!! I put a yellow paper clip in the hole for clarification, you **** the hammer and hold the hammer all the way back, insert a pin in hole, then the hammer can be lowered and the spring is held in place preloaded and can be removed for disassembly. Pins are smooth, so they can be removed from either side.Hope this helps someone,
Tim
http://www.gunpartscorp.com/Manufacturers/HarringtonRichardson-33274/Shotguns-36451/1900-40868.htm